

Last updated March 2021
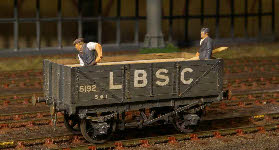
Once the main bits of the wagon body are assembled, it’s time to consider the underframe. I’ll confess to being a ‘traditionalist’ - I’m happy with the tried and tested principles of the rocking W-irons, which have worked well for me over the years. However, there are three particular problems which I have encountered in the past when making wagons:
- it can be quite difficult to apply enough weight to an open wagon - especially an empty open
- getting the axles exactly parallel and square is key, and obviously affects how reliably a wagon stays on the track
- and finally side-play of axles between the bearings affects running (ie the wagon won’t run straight, especially when being pushed).
 I recently bought some excellent LBSCR W-
irons from EB Models, and these are noticeably ‘shallower’ than many other makes - in other words they need some packing between the wagon floor and the W-iron to bring the wagon to the correct height - about 1.5mm. As it happens, roofing lead is about 1.5mm thick, ideal for the packing piece, and a convenient way to add some weight.
However, these W-irons seem to suffer the same fate as virtually all the others I have ever used. If they are bent perfectly square, and standard pin-point bearings are used, there is at least 0.5mm sideplay in the axle. Perhaps the bearings I’ve got are too deep, but they all seem to be the same. Does everybody have this problem? I found the solution in some fibre washers, about 0.25mm thick, and with a 2mm hole. These fit neatly between the bearing and the W-iron, keeping the W-iron square, and minimising the sideplay.
 Finally, I have invested in a Brassmaster’s axle setting gauge, which is very good (and very well designed) for ensuring that the axles are exactly the right spacing, and exactly parallel.
 It occurred to me that a very convenient way to assemble all the bits was, firstly to make up the W-
irons, with wheels, bearings and fibre washers, and then, using the Brassmaster’s gauge, glue the lead spacer across the W-irons, to produce a truly square sub-assembly, which can be fixed as a unit to the floor of the wagon. Sole bars are then added last, ensuring that there is space for the rocking end to rock freely. Hopefully the photos should make this clearer.
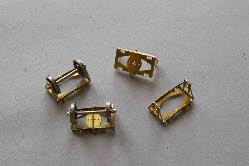
Once the running gear has been completed, the rest of the detail can be added, plate washers on the sole bars, backing plates for the buffers and coupling hooks. All of these components can be cut individually from 5 thou plasticard, However, many years ago I made a set of steel punches for cutting out these parts, as shown in the photo. There are various shapes for different bits, but all have a concave face for the cutting edge. By placing a piece of 5 thou plasticard on a sheet of lead, a sharp tap with a hammer will cut through the plasticard, and provide consistent, equally sized pieces.
For the last of these wagons, I’ve abandoned the use of the punches, and used brass etchings from the EBM W-iron etch for the crown plates and drawbar pockets. For shapes not available (the wagon number plate and the buffer back plates for example) I’ve moved onto drawing these parts in Turbocad, and using my Silhouette flatbed cutter which can cut as many pieces as required from a single drawing.
The final stage is the addition of buffers and couplings, and then painting and weathering, and the addition of loads and tarpaulin
 I recently bought some excellent LBSCR W-
However, these W-
 Finally, I have invested in a Brassmaster’s axle setting gauge, which is very good (and very well designed) for ensuring that the axles are exactly the right spacing, and exactly parallel.
 It occurred to me that a very convenient way to assemble all the bits was, firstly to make up the W-
Once the running gear has been completed, the rest of the detail can be added, plate washers on the sole bars, backing plates for the buffers and coupling hooks. All of these components can be cut individually from 5 thou plasticard, However, many years ago I made a set of steel punches for cutting out these parts, as shown in the photo. There are various shapes for different bits, but all have a concave face for the cutting edge. By placing a piece of 5 thou plasticard on a sheet of lead, a sharp tap with a hammer will cut through the plasticard, and provide consistent, equally sized pieces.
For the last of these wagons, I’ve abandoned the use of the punches, and used brass etchings from the EBM W-
The final stage is the addition of buffers and couplings, and then painting and weathering, and the addition of loads and tarpaulin